通过指令自动化的发送邮件
提示:文章写完后,目录可以自动生成,如何生成可参考右边的帮助文档
文章目录
前言
JAVA作为BackEnd实现邮件的定时发送,批量发送对很多业务场景有这重要的意义。例如:给用户发送发票、订阅、广告、数据的报表推送、验证账号、验证码、定时回复等等业务场景均需要该功能。因此,简单总结了下自动化发送的注意点,及实现逻辑,望大家指正。原先的文章进行更新
javaMail发送邮件
正文内容
一、Mail(邮件)
电子邮件是—种用电子手段提供信息交换的通信方式,是互联网应用最广的服务。通过网络的电子邮件系统,用户可以以非常低廉的价格(不管发送到哪里,都只需负担网费)、非常快速的方式(几秒钟之内可以发送到世界上任何指定的目的地),与世界上任何一个角落的网络用户联系。
电子邮件可以是文字、图像、声音等多种形式。同时,用户可以得到大量免费的新闻、专题邮件,并轻松实现轻松的信息搜索。电子邮件的存在极大地方便了人与人之间的沟通与交流,促进了社会的发展。
邮件是基于SMTP协议的一种传输方式。
SMTP协议的工作过程可分为如下3个过程:
- 建立连接:在这一阶段,SMTP客户请求与服务器的25端口建立一个TCP连接。一旦连接建立,SMTP服务器和客户就开始相互通告自己的域名,同时确认对方的域名。
- 邮件传送:利用命令,SMTP客户将邮件的源地址、目的地址和邮件的具体内容传递给SMTP服务器,SMTP服务器进行相应的响应并接收邮件。
- 连接释放:SMTP客户发出退出命令,服务器在处理命令后进行响应,随后关闭TCP连接。
邮件可以包括主题,标题、内容、附件等,附件包括音视频等各种文件类型。

二、使用步骤
1.引入库
build.gradle(示例):
    // https://mvnrepository.com/artifact/com.sun.mail/javax.mail
    compile group: 'com.sun.mail', name: 'javax.mail', version: '1.6.2'
Maven(示例):
<!-- https://mvnrepository.com/artifact/com.sun.mail/javax.mail -->
<dependency>
    <groupId>com.sun.mail</groupId>
    <artifactId>javax.mail</artifactId>
    <version>1.6.2</version>
</dependency>
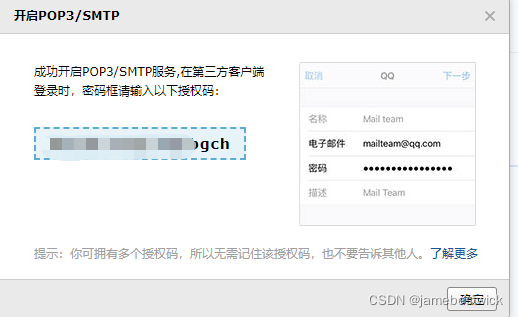
2.开启邮件服务商:POP3/SMTP服务
(以QQ邮箱为示例):
进入QQ邮箱,选择设置–>账户,找到 开启服务:POP3/SMTP服务,QQ会要求你发送XX短信到指定号码,发送成功后,QQ会返回一个授权码,用于第三方登录使用,授权码一定要记住,后面程序发送邮件要用,再次登录,他就不显示了。

package com.xxx.xxx.utils;

import com.sun.mail.util.MailSSLSocketFactory;
import org.apache.commons.lang.StringUtils;

import javax.activation.DataHandler;
import javax.activation.DataSource;
import javax.activation.FileDataSource;
import javax.mail.*;
import javax.mail.internet.*;
import java.io.UnsupportedEncodingException;
import java.security.GeneralSecurityException;
import java.util.Properties;

/**
 * * Created by [email protected]
 * * github: jambestwick
 * * on 2020/3/11
 * 发送邮件工具
 * *
 */
public class SendMailAcceUtils {

    /**
     * 发送带附件的邮件
     *
     * @param receive  收件人
     * @param subject  邮件主题
     * @param msg      邮件内容
     * @param filename 附件地址,本地文件
     * @return boolean
     */
    public static boolean sendQQMail(String receive, String subject, String msg, String filename) {
        if (StringUtils.isEmpty(receive)) {
            return false;
        }
        // 发件人电子邮箱
        final String from = "[email protected]";
        // 发件人电子邮箱授权码
        final String pass = "xxxxxxxxxuuxxxxx";

        // 指定发送邮件的主机为 smtp.qq.com
        String host = "smtp.qq.com"; // 邮件服务器

        // 获取系统属性
        Properties properties = System.getProperties();

        // 设置邮件服务器
        properties.setProperty("mail.smtp.host", host);
        properties.put("mail.transport.protocol", "smtp");// 连接协议
        properties.put("mail.smtp.host", host);// 主机名
        properties.put("mail.smtp.port", 465);// 端口号
        properties.put("mail.smtp.auth", "true");
        properties.put("mail.smtp.ssl.enable", "true");// 设置是否使用ssl安全连接 ---一般都使用
        properties.put("mail.debug", "true");// 设置是否显示debug信息 true 会在控制台显示相关信息
        try {
            // 得到回话对象
            Session session = Session.getInstance(properties);
            // 获取邮件对象
            Message message = new MimeMessage(session);
            // 设置发件人邮箱地址
            message.setFrom(new InternetAddress(from));
            // 设置收件人邮箱地址
            //message.setRecipients(Message.RecipientType.TO, new InternetAddress[]{new InternetAddress(receive), new InternetAddress(receive), new InternetAddress(receive)});
            message.setRecipient(Message.RecipientType.TO, new InternetAddress(receive));//一个收件人
            // 设置邮件标题
            message.setSubject(subject);
            // 创建消息部分
            BodyPart messageBodyPart = new MimeBodyPart();
            // 消息
            messageBodyPart.setText(msg);

            // 创建多重消息
            Multipart multipart = new MimeMultipart();

            // 设置文本消息部分
            multipart.addBodyPart(messageBodyPart);

            // 附件部分
            messageBodyPart = new MimeBodyPart();
            // 设置要发送附件的文件路径
            DataSource source = new FileDataSource(filename);
            messageBodyPart.setDataHandler(new DataHandler(source));

            // messageBodyPart.setFileName(filename);
            // 处理附件名称中文(附带文件路径)乱码问题
            messageBodyPart.setFileName(MimeUtility.encodeText(filename));
            multipart.addBodyPart(messageBodyPart);

            // 发送完整消息
            message.setContent(multipart);

            // 得到邮差对象
            Transport transport = session.getTransport();
            // 连接自己的邮箱账户
            transport.connect(from, pass);// 密码为QQ邮箱开通的stmp服务后得到的客户端授权码
            // 发送邮件
            transport.sendMessage(message, message.getAllRecipients());
            transport.close();
            return true;
        } catch (MessagingException | UnsupportedEncodingException e) {
            e.printStackTrace();
        }
        return false;
    }

    /***
     * 不带有附件的方法
     * 可以将发送者封装提取出来,作为入参
     * **/
    public static boolean sendQQMailWithOutFile(String receive, String subject, String msg){
        if (StringUtils.isEmpty(receive)) {
            return false;
        }
        // 发件人电子邮箱
        final String from = "[email protected]";
        // 发件人电子邮箱授权码
        final String pass = "xxxxxxxxxxxxxxxx";

        // 指定发送邮件的主机为 smtp.qq.com
        String host = "smtp.qq.com"; // 邮件服务器

        // 获取系统属性
        Properties properties = System.getProperties();

        // 设置邮件服务器
        properties.setProperty("mail.smtp.host", host);
        properties.put("mail.transport.protocol", "smtp");// 连接协议
        properties.put("mail.smtp.host", host);// 主机名
        properties.put("mail.smtp.port", 465);// 端口号
        properties.put("mail.smtp.auth", "true");
        properties.put("mail.smtp.ssl.enable", "true");// 设置是否使用ssl安全连接 ---一般都使用
        properties.put("mail.debug", "true");// 设置是否显示debug信息 true 会在控制台显示相关信息
        try {
            // 得到回话对象
            Session session = Session.getInstance(properties);
            // 获取邮件对象
            Message message = new MimeMessage(session);
            // 设置发件人邮箱地址
            message.setFrom(new InternetAddress(from));
            // 设置收件人邮箱地址
            //message.setRecipients(Message.RecipientType.TO, new InternetAddress[]{new InternetAddress(receive), new InternetAddress(receive), new InternetAddress(receive)});
            message.setRecipient(Message.RecipientType.TO, new InternetAddress(receive));//一个收件人
            // 设置邮件标题
            message.setSubject(subject);
            // 创建消息部分
            BodyPart messageBodyPart = new MimeBodyPart();
            // 消息
            messageBodyPart.setText(msg);

            // 创建多重消息
            Multipart multipart = new MimeMultipart();

            // 设置文本消息部分
            multipart.addBodyPart(messageBodyPart);
            // 发送完整消息
            message.setContent(multipart);

            // 得到邮差对象
            Transport transport = session.getTransport();
            // 连接自己的邮箱账户
            transport.connect(from, pass);// 密码为QQ邮箱开通的stmp服务后得到的客户端授权码
            // 发送邮件
            transport.sendMessage(message, message.getAllRecipients());
            transport.close();
            return true;
        } catch (MessagingException e) {
            e.printStackTrace();
        }
        return false;
    }

    /**
     * @param send 发送者邮箱
     * @param authCode 授权码
     * @param receive 接收者邮箱
     * @param subject 邮件主题
     * @param filename 本地附件
     * **/
    public static boolean send126Mail(String send, String authCode, String receive, String subject, String msg, String filename) {
        if (StringUtils.isEmpty(receive)) {
            return false;
        }
        // 发件人电子邮箱
        PasswordAuthentication passwordAuthentication = new PasswordAuthentication(send, authCode);
        // 指定发送邮件的主机为 smtp.126.com
        String host = "smtp.126.com"; // 邮件服务器

        // 获取系统属性
        Properties properties = System.getProperties();
        // 1. 创建参数配置, 用于连接邮件服务器的参数配置
        properties.put("mail.transport.protocol", "smtp");// 连接协议
        properties.setProperty("mail.smtp.host", host);
        //设 置 邮 件服 务 器 主 机 名
        properties.setProperty("mail.host", host);
        properties.put("mail.smtp.host", host);// 主机名
        properties.put("mail.smtp.port", 465);// 端口号
        properties.put("mail.smtp.auth", "true");
        properties.put("mail.smtp.ssl.enable", "true");// 设置是否使用ssl安全连接 ---一般都使用
        properties.put("mail.debug", "true");// 设置是否显示debug信息 true 会在控制台显示相关信息
        try {
            //开 启 S S L 加 密,否 则 会 失 败
            MailSSLSocketFactory sf = new MailSSLSocketFactory();
            sf.setTrustAllHosts(true);
            properties.put("mail.smtp.ssl.socketFactory", sf);
            //解决附件文件名过长的问题
            properties.put("mail.mime.splitlongparameters", "false");
            // 2. 根据配置创建会话对象, 用于和邮件服务器交互
            Session session = Session.getInstance(properties, new Authenticator() {
                @Override
                protected PasswordAuthentication getPasswordAuthentication() {
                    return passwordAuthentication;
                }
            });
            session.setDebug(true);                                 // 设置为debug模式, 可以查看详细的发送 log
            // 3. 创建一封邮件
            Message message = new MimeMessage(session);
            // 设置发件人邮箱地址
            message.setFrom(new InternetAddress(send));
            // 设置收件人邮箱地址
            //message.setRecipients(Message.RecipientType.TO, new InternetAddress[]{new InternetAddress(receive), new InternetAddress(receive), new InternetAddress(receive)});
            message.setRecipient(Message.RecipientType.TO, new InternetAddress(receive));//一个收件人
            // 设置邮件标题
            message.setSubject(subject);
            // 创建消息部分
            BodyPart messageBodyPart = new MimeBodyPart();
            // 消息
            messageBodyPart.setText(msg);

            // 创建多重消息
            Multipart multipart = new MimeMultipart();

            // 设置文本消息部分
            multipart.addBodyPart(messageBodyPart);

            // 附件部分
            messageBodyPart = new MimeBodyPart();
            // 设置要发送附件的文件路径
            DataSource source = new FileDataSource(filename);
            messageBodyPart.setDataHandler(new DataHandler(source));

            // messageBodyPart.setFileName(filename);
            // 处理附件名称中文(附带文件路径)乱码问题
            messageBodyPart.setFileName(MimeUtility.encodeText(filename));
            multipart.addBodyPart(messageBodyPart);

            // 发送完整消息
            message.setContent(multipart);

            // 4. 根据 Session 获取邮件传输对象
            Transport transport = session.getTransport();

            // 5. 使用 邮箱账号 和 密码 连接邮件服务器, 这里认证的邮箱必须与 message 中的发件人邮箱一致, 否则报错
            //
            //    PS_01: 成败的判断关键在此一句, 如果连接服务器失败, 都会在控制台输出相应失败原因的 log,
            //           仔细查看失败原因, 有些邮箱服务器会返回错误码或查看错误类型的链接, 根据给出的错误
            //           类型到对应邮件服务器的帮助网站上查看具体失败原因。
            //
            //    PS_02: 连接失败的原因通常为以下几点, 仔细检查代码:
            //           (1) 邮箱没有开启 SMTP 服务;
            //           (2) 邮箱密码错误, 例如某些邮箱开启了独立密码;
            //           (3) 邮箱服务器要求必须要使用 SSL 安全连接;
            //           (4) 请求过于频繁或其他原因, 被邮件服务器拒绝服务;
            //           (5) 如果以上几点都确定无误, 到邮件服务器网站查找帮助。
            //
            //    PS_03: 仔细看log, 认真看log, 看懂log, 错误原因都在log已说明。
            transport.connect(passwordAuthentication.getUserName(), passwordAuthentication.getPassword());// 密码为126邮箱开通的stmp服务后得到的客户端授权码
            // 6. 发送邮件, 发到所有的收件地址, message.getAllRecipients() 获取到的是在创建邮件对象时添加的所有收件人, 抄送人, 密送人
            transport.sendMessage(message, message.getAllRecipients());
            // 7. 关闭连接
            transport.close();
            return true;
        } catch (MessagingException | UnsupportedEncodingException | GeneralSecurityException e) {
            e.printStackTrace();
        }
        return false;
    }

}
同理先进入邮箱,申请SMTP授权码,授权码一定要记住 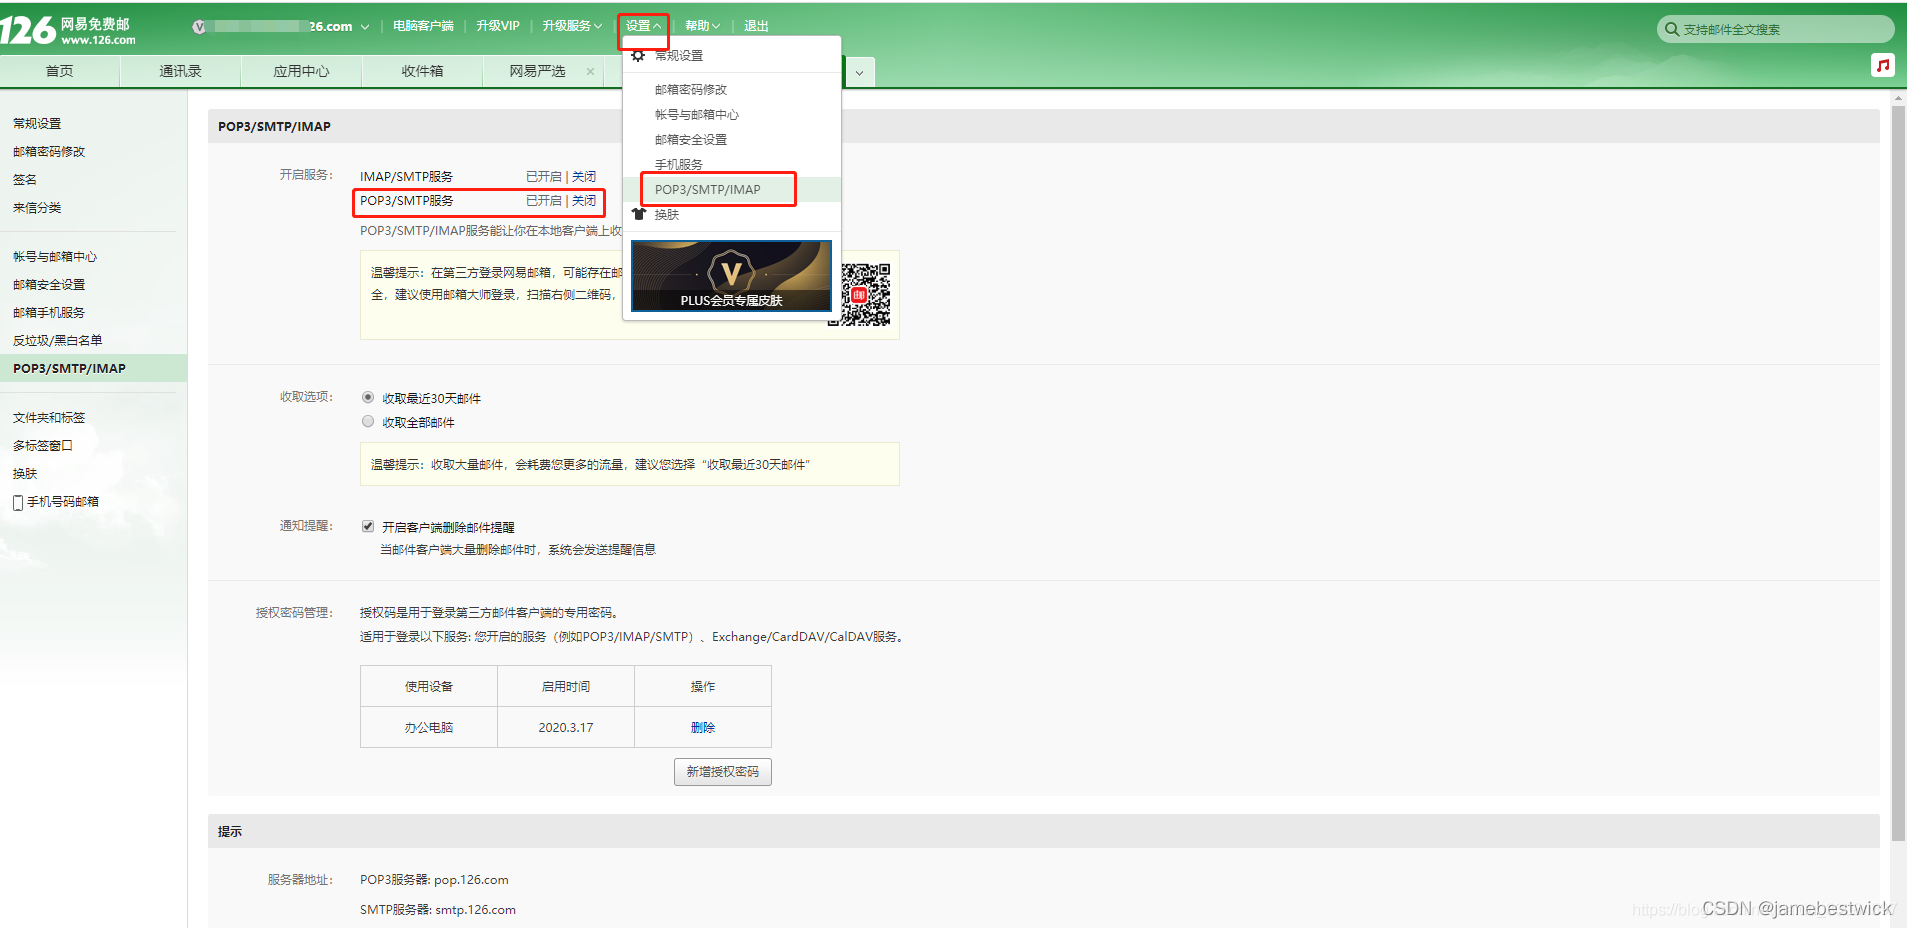
测试代码:
package com.java.mail.test;

import com.java.mail.util.SendMailAcceUtils;

public class Test {
    public static void main(String[] args) {
        SendMailAcceUtils.sendQQMailWithOutFile("[email protected]","testTemp","web3j");
        SendMailAcceUtils.send126Mail("[email protected]","xxxx","[email protected]","web3j","wexxxx",null);
    }
}
总结
提示:亲测可用。
项目放在github上,喜欢自取。地址:https://github.com/ETCPark/JavaMail